Ways to Give Old Furniture a New Life
When it comes to refreshing old furniture, there are numerous creative ways to breathe new life into worn-out pieces. Repurposing and upcycling furniture not only adds a personalized touch to your space but also contributes to sustainable living by reducing waste. From transforming old dressers into stylish bathroom vanities to adding new hardware for a contemporary update, the possibilities are endless.
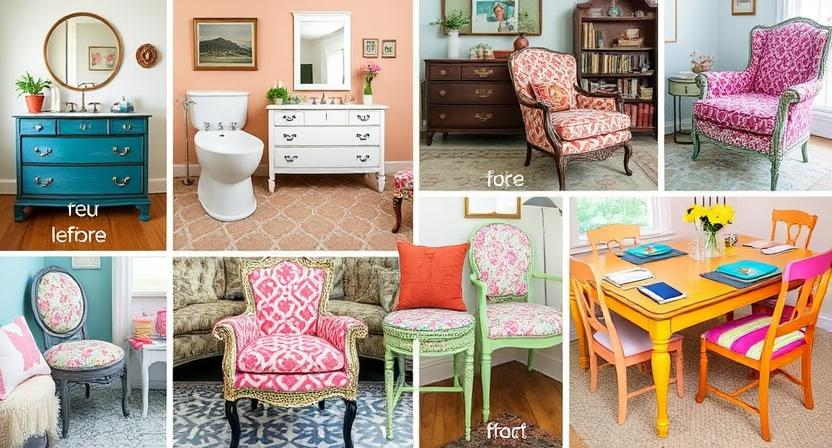
With a fresh coat of paint or stain, outdated furniture can be completely transformed to suit your desired aesthetic. Experimenting with different painting techniques, such as distressing or adding a modern twist with bold colors, can give old furniture a new lease on life. Additionally, reupholstering old chairs and sofas or using decoupage and stenciling techniques can provide a unique and customized look to your furniture pieces, making them stand out in any room.
• Repurpose old dressers into stylish bathroom vanities
• Add new hardware for a contemporary update
• Experiment with different painting techniques like distressing or bold colors
• Reupholster old chairs and sofas for a fresh look
• Use decoupage and stenciling techniques for a unique touch
Choosing the Right Piece of Furniture to Repurpose
When choosing a piece of furniture to repurpose, it’s important to consider the overall condition of the item. Look for pieces that are structurally sound and free from major damage. Minor scratches or dents can easily be fixed, but significant issues like broken legs or water damage may be more challenging to repair.
Additionally, think about the style and shape of the furniture piece. Opt for pieces that have interesting details or unique characteristics that can be enhanced through repurposing. Keep in mind the functionality of the item as well – consider how you can transform it to better suit your needs while still maintaining its original charm.
• Look for pieces that are structurally sound and free from major damage
• Minor scratches or dents can easily be fixed
• Significant issues like broken legs or water damage may be more challenging to repair
• Opt for pieces with interesting details or unique characteristics
• Consider the functionality of the item and how it can be transformed to better suit your needs while maintaining its original charm
Sanding and Preparing the Surface for a Fresh Look
Before embarking on your furniture repurposing journey, it is crucial to invest time and effort into properly sanding and preparing the surface for a fresh look. Begin by using a medium-grit sandpaper to remove any existing finish or imperfections on the piece. Take care to sand in the direction of the wood grain to prevent any potential damage to the surface. Once the initial sanding is complete, switch to a finer grit sandpaper to smooth out the wood and ensure a flawless base for painting or staining.
After sanding, thoroughly clean the furniture piece to remove any dust or debris that may have accumulated. This step is essential to guarantee a smooth and even application of paint or stain. Use a damp cloth to wipe down the entire surface, followed by a dry cloth to ensure all moisture is removed. Taking the time to properly sand and prepare the surface will not only improve the aesthetic appeal of your furniture but also enhance the longevity of your repurposed piece.
• Begin by using a medium-grit sandpaper to remove existing finish or imperfections
• Sand in the direction of the wood grain to prevent damage to the surface
• Switch to a finer grit sandpaper for a smooth base for painting or staining
• Thoroughly clean the furniture piece after sanding to remove dust and debris
• Use a damp cloth followed by a dry cloth to ensure all moisture is removed
Painting Techniques for a Modern Update
When looking to breathe new life into old furniture, painting is a versatile technique that can instantly modernize a piece. Before beginning the painting process, it’s crucial to prepare the surface properly. This involves sanding down any rough patches or old finishes to create a smooth base for the new paint to adhere to. Additionally, wiping down the surface with a damp cloth to remove any dust or debris is essential for achieving a clean and professional finish.
Once the surface is prepped and ready, selecting the right paint color can make a significant impact on the overall look of the furniture. For a modern update, bold and vibrant colors can add a pop of personality and contemporary flair to the piece. Alternatively, opting for a sleek monochromatic palette can create a chic and sophisticated look that complements a modern aesthetic. Experimenting with different painting techniques such as ombre effects, color blocking, or geometric patterns can further enhance the modern appeal of the furniture and make it stand out as a stylish statement piece in any space.
• Ombre effects can create a gradient look that adds depth and dimension to the furniture
• Color blocking can add a bold and graphic element to the piece, perfect for making a statement
• Geometric patterns can bring a modern and artistic touch to the furniture, elevating its design
Once the paint has dried, applying a clear coat of sealant or varnish is essential for protecting the finish from scratches, stains, and general wear and tear. This final step not only preserves the newly painted surface but also enhances its durability and longevity. Additionally, adding new hardware or accents such as metallic handles or decorative knobs can further elevate the modern aesthetic of the furniture.
By utilizing these painting techniques and tips, old furniture pieces can be transformed into stylish and contemporary additions to any home decor. Whether opting for bold colors or subtle hues, experimenting with different finishes or patterns, painting offers endless possibilities for updating outdated furniture in a modern way. With some creativity and effort, anyone can achieve a fresh new look for their living space by simply picking up a paintbrush.
Staining Old Furniture for a Rustic Feel
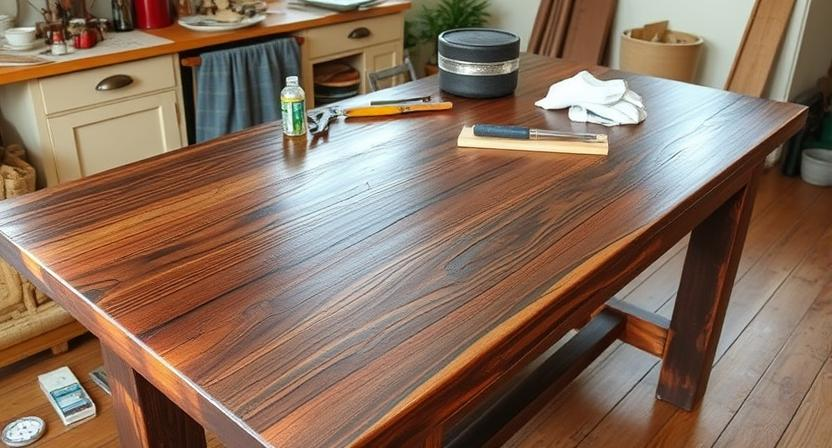
Staining old furniture can instantly give it a charming rustic feel, perfect for adding warmth and character to any space. Before beginning the staining process, it’s essential to prepare the surface by sanding it thoroughly to ensure a smooth and even finish. Make sure to remove any existing finish or paint to allow the stain to penetrate the wood properly.
When choosing a stain, opt for rich, earthy tones like walnut, chestnut, or mahogany to enhance the natural beauty of the wood and achieve that desirable rustic look. Apply the stain evenly with a brush or soft cloth, following the grain of the wood to ensure a consistent finish. Allow the stain to dry completely before adding a clear sealant to protect the wood and enhance its durability. Staining old furniture is a simple yet effective way to breathe new life into dated pieces and create a cozy, rustic ambiance in your home.
• Sand the old furniture thoroughly before staining
• Choose rich, earthy tones like walnut or chestnut for a rustic look
• Apply the stain evenly with a brush or cloth following the wood grain
• Allow the stain to dry completely before adding a clear sealant
Staining old furniture is an easy and affordable way to transform your space and create a cozy atmosphere. With just a few simple steps, you can give new life to old pieces and enjoy the warmth and character of rustic decor in your home. Whether you’re looking to update an antique find or refresh outdated furniture, staining is a versatile technique that can enhance the beauty of any piece. Embrace the charm of aged wood with a fresh coat of stain and bring a touch of rustic elegance into your living space today.
Adding New Hardware for a Contemporary Touch
When looking to update old furniture with a contemporary touch, one simple yet effective way is by adding new hardware. Swapping out outdated knobs, handles, or pulls with sleek and modern options can instantly elevate the look of a piece. Choose hardware that complements the style of the furniture and consider finishes like brushed nickel, matte black, or brass for a sophisticated update.
Hardware can serve as a focal point or an accent, depending on your design goals. For a cohesive look, opt for matching hardware throughout a room or space. However, mixing different styles or finishes can also create an eclectic and personalized touch. Whether it’s a dresser, cabinet, or side table, updating the hardware can make a significant impact on the overall aesthetic of the piece and tie in with the contemporary theme of your decor.
• Swapping out outdated knobs, handles, or pulls with sleek and modern options can instantly elevate the look of a piece
• Choose hardware that complements the style of the furniture and consider finishes like brushed nickel, matte black, or brass for a sophisticated update
• Hardware can serve as a focal point or an accent, depending on your design goals
• Opt for matching hardware throughout a room for a cohesive look
• Mixing different styles or finishes can create an eclectic and personalized touch
Decoupage and Stenciling for a Unique Design
Decoupage and stenciling are creative techniques that can breathe new life into old furniture pieces. Decoupage involves applying layers of paper cutouts or fabric onto the surface of the furniture, creating unique and personalized designs. This technique allows you to experiment with patterns, textures, and colors to achieve a one-of-a-kind look that suits your style preferences.
Stenciling, on the other hand, involves using pre-cut stencils to apply designs directly onto the furniture. This method allows for precise detailing and intricate patterns to be incorporated into the furniture’s finish. Whether you opt for a subtle and understated design or a bold and eye-catching motif, stenciling offers endless possibilities for transforming your old furniture into a statement piece that adds character and charm to your living space.
• Decoupage involves applying layers of paper cutouts or fabric onto the surface of furniture
• Allows for experimentation with patterns, textures, and colors
• Creates unique and personalized designs
• Stenciling uses pre-cut stencils to apply designs directly onto furniture
• Allows for precise detailing and intricate patterns
• Offers endless possibilities for transforming old furniture into statement pieces
Reupholstering Old Chairs and Sofas
When looking to breathe new life into old chairs and sofas, reupholstering can be a fantastic option. By removing the existing fabric and padding, you can transform the entire look of the piece. Choose a durable and stylish fabric that complements your home’s decor for a fresh update. Whether you opt for a vibrant pattern or a neutral tone, reupholstering allows you to customize the furniture to suit your style preferences.
Reupholstering old chairs and sofas not only enhances their appearance but also extends their lifespan. Investing in quality materials and craftsmanship during the reupholstering process can ensure that your furniture remains comfortable and visually appealing for years to come. Consider consulting with a professional upholsterer to achieve the best results and breathe new life into your beloved furniture pieces.
• Reupholstering can transform the entire look of old chairs and sofas
• Choose a durable and stylish fabric that complements your home’s decor
• Customize the furniture to suit your style preferences with reupholstering
• Enhances appearance and extends lifespan of furniture pieces
• Investing in quality materials and craftsmanship is key
• Consult with a professional upholsterer for best results
Creating a Distressed Finish for a Shabby Chic Look
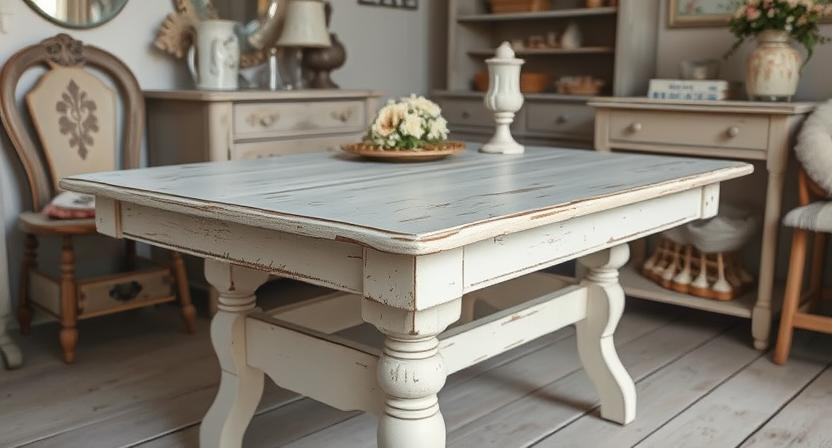
To achieve a shabby chic look when distressing furniture, start by lightly sanding the piece to create a smooth surface for paint or stain application. Use sandpaper to gently roughen up edges, corners, and areas where natural wear would occur over time. This will add character and age to the furniture, giving it that sought-after distressed appearance.
After sanding, apply a base coat of paint in a pastel or muted hue to the furniture, allowing it to dry completely. Once dry, use sandpaper to gently rub away some of the paint, focusing on areas that would naturally wear down with use. This technique will reveal hints of the base coat underneath, creating a weathered and aged look that is characteristic of shabby chic style. Remember to work in small sections and step back periodically to assess the level of distressing achieved, ensuring a balanced and authentic appearance.
• Lightly sand the furniture piece to create a smooth surface
• Use sandpaper to roughen up edges, corners, and natural wear areas
• Apply a base coat of paint in a pastel or muted hue
• Allow the paint to dry completely before distressing
• Gently rub away some of the paint with sandpaper to reveal hints of the base coat underneath
• Work in small sections and step back periodically to assess distressing level
Using Wallpaper to Revamp Old Furniture
One creative way to revamp old furniture is by using wallpaper to add a fresh and stylish touch. Wallpaper can be a versatile and cost-effective option to breathe new life into tired pieces. Whether you want to add a pop of color, a bold pattern, or a subtle texture, there are countless options available to suit your design preferences.
To use wallpaper for revamping old furniture, start by selecting a design that complements the piece you are working on. Measure and cut the wallpaper to fit the surface you want to cover, ensuring a smooth application. Use adhesive to secure the wallpaper in place, smoothing out any bubbles or creases as you go. This method allows you to easily customize furniture pieces such as dressers, cabinets, or tabletops, giving them a unique and personalized look.
• Choose a wallpaper design that complements the furniture piece
• Measure and cut the wallpaper to fit the surface smoothly
• Use adhesive to secure the wallpaper in place
• Smooth out any bubbles or creases during application
• Customize dressers, cabinets, or tabletops for a unique look
Repurposing Old Doors and Windows for a Vintage Vibe
One creative way to infuse a vintage vibe into your home decor is by repurposing old doors and windows. These architectural elements carry a unique charm and character that can instantly elevate the aesthetic of a space. By incorporating them into your interior design, you can add a touch of history and nostalgia to your home.
Old doors can be transformed into eye-catching statement pieces such as dining room tables or room dividers. The weathered patina and intricate details of vintage doors can bring a sense of warmth and authenticity to your decor. Similarly, old windows can be repurposed into decorative mirrors or unique photo frames, adding a touch of rustic elegance to any room. Letting these pieces shine in their new roles not only breathes new life into them but also infuses your space with a sense of timelessness and character.
– Repurpose old doors into dining room tables or room dividers
– Old doors bring warmth and authenticity with their weathered patina and intricate details
– Transform old windows into decorative mirrors or unique photo frames
– Adding vintage doors and windows adds a touch of history and nostalgia to your home decor
Turning Old Dressers into Bathroom Vanities
Repurposing old dressers into bathroom vanities is a creative way to add character and charm to your space. By transforming a dresser into a functional piece for your bathroom, you can achieve a unique and personalized look that reflects your style. With some modifications and a fresh coat of paint, you can turn an old dresser into a beautiful focal point in your bathroom.
Old dressers offer ample storage space, making them ideal for holding towels, toiletries, and other bathroom essentials. By retrofitting the drawers to accommodate plumbing fixtures, you can create a one-of-a-kind vanity that is both stylish and practical. The addition of a sink and countertop can further enhance the functionality of the dresser, turning it into a functional piece of furniture that also serves as a statement piece in your bathroom.
• Repurposing old dressers into bathroom vanities adds character and charm to your space
• Transforming a dresser into a functional piece for your bathroom allows for a unique and personalized look
• Modifications and a fresh coat of paint can turn an old dresser into a beautiful focal point in your bathroom
• Old dressers offer ample storage space for towels, toiletries, and other bathroom essentials
• Retrofitting drawers to accommodate plumbing fixtures creates a stylish and practical vanity
• Adding a sink and countertop enhances the functionality of the dresser as well as serving as a statement piece in the bathroom.
Transforming a Bookshelf into a Bar Cart
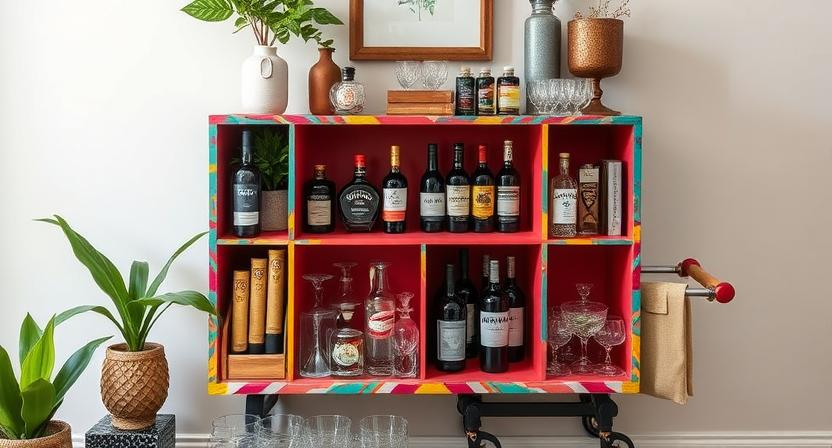
Bookshelves are versatile pieces of furniture that can be repurposed in numerous creative ways to suit different needs and styles. One innovative idea is transforming a bookshelf into a stylish bar cart. By making a few simple adjustments and additions, you can turn a standard bookshelf into a functional and chic serving station for your home.
To begin the transformation process, start by removing any unnecessary shelves to create space for storing bottles, glassware, and bar accessories. Consider adding hooks or racks to hang wine glasses, a wine bottle holder, and shelves for liquor bottles and mixers. A fresh coat of paint or some decorative wallpaper can give the bookshelf a vibrant and colorful look that complements your home decor. With a few tweaks and a touch of creativity, you can repurpose a bookshelf into a unique and eye-catching bar cart that will impress your guests and elevate your entertaining space.
• Remove unnecessary shelves to create space for storing bottles, glassware, and bar accessories
• Add hooks or racks to hang wine glasses
• Include a wine bottle holder and shelves for liquor bottles and mixers
• Consider giving the bookshelf a fresh coat of paint or decorative wallpaper to match your home decor
Upcycling Old Tables into Stylish Desks
Upcycling old tables into stylish desks is a creative way to breathe new life into old furniture pieces. By repurposing a sturdy and well-built table, you can transform it into a functional and aesthetically pleasing workspace for your home office or study area. The process often involves removing any existing finish, sanding down the surface, and applying a fresh coat of paint or stain to match your décor.
Adding unique touches such as decorative drawer pulls, a sleek glass top, or stylish legs can elevate the look of the desk and give it a modern flair. By incorporating personal touches and design elements, you can customize the desk to suit your individual style and preferences. Upcycling old tables into stylish desks not only reduces waste but also allows you to create a one-of-a-kind piece that adds character and charm to your space.
• When selecting an old table to upcycle, look for one with a solid structure and interesting design details.
• Consider the size and shape of the table to ensure it will fit comfortably in your workspace.
• Experiment with different paint colors or stains to achieve the desired look for your desk.
• Don’t be afraid to get creative with hardware choices such as drawer pulls or knobs to add personality to the desk.
• Upcycling old tables into stylish desks is a budget-friendly way to create a unique piece of furniture that reflects your personal style.
Repurposing Old Cabinets for Kitchen Storage
Repurposing old cabinets for kitchen storage is a creative way to breathe new life into outdated furniture. By repurposing old cabinets, you can not only enhance the functionality of your kitchen but also add a touch of character and charm to the space. Whether you’re looking to create additional storage for pantry items, cookware, or even display your collection of dishes, repurposing old cabinets can offer a practical and aesthetically pleasing solution.
When repurposing old cabinets for kitchen storage, consider giving them a fresh coat of paint or stain to match your existing décor or create a contrasting accent piece. Additionally, you can replace old hardware with modern handles or knobs to give the cabinets a more contemporary look. By repurposing old cabinets, you can customize the storage solutions to fit your specific needs and style preferences while also reducing waste and contributing to a more sustainable home environment.
• When repurposing old cabinets, consider the following:
– Giving them a fresh coat of paint or stain
– Replacing old hardware with modern handles or knobs
– Customizing storage solutions to fit your specific needs and style preferences
• Repurposing old cabinets can offer the following benefits:
– Enhancing the functionality of your kitchen
– Adding character and charm to the space
– Contributing to a more sustainable home environment
Adding Legs to Old Furniture for a Mid-Century Modern Look
When looking to give old furniture a fresh and stylish update, adding legs can be a great way to achieve a mid-century modern look. This simple yet effective technique can instantly transform a piece and give it a more modern and sleek appearance. Whether you have a vintage dresser, a classic armchair, or a retro side table, adding tapered or hairpin legs can elevate the aesthetic and bring a touch of mid-century charm to your space.
The beauty of adding legs to old furniture lies in its versatility and ease of implementation. With a variety of leg styles, heights, and finishes available, you can customize the look to suit your personal taste and complement your existing decor. This budget-friendly DIY project requires minimal tools and expertise, making it a fun and accessible way to breathe new life into your beloved furniture pieces.
• Tapered or hairpin legs can instantly transform the look of old furniture
• Versatile and customizable with a variety of leg styles, heights, and finishes available
• Budget-friendly DIY project that requires minimal tools and expertise
• A fun and accessible way to give a mid-century modern update to your space
Creating a Gallery Wall with Old Frames
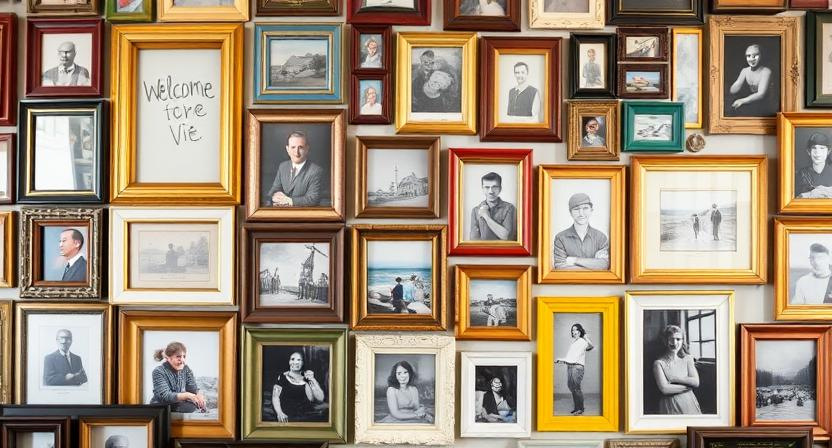
When it comes to sprucing up your space with a touch of elegance and personality, creating a gallery wall with old frames can be a charming and budget-friendly option. By repurposing old frames that you may have stored away or finding unique ones at thrift stores or flea markets, you can add a vintage flair to your home decor. Mix and match frames of different sizes, shapes, and finishes to create an eclectic and visually appealing display on your walls.
To enhance the aesthetic appeal of your gallery wall, consider incorporating a variety of artwork, such as photographs, prints, and paintings, that resonate with your personal style and complement the overall theme of your space. Experiment with different layouts by arranging the frames in a cohesive manner or opting for a more asymmetrical and whimsical design. Displaying cherished memories and artistic pieces in old frames not only adds character to your home but also serves as a unique conversation starter for guests.
• When creating a gallery wall with old frames, consider the following tips:
• Mix and match frames of different sizes, shapes, and finishes for visual interest.
• Incorporate a variety of artwork such as photographs, prints, and paintings to enhance the overall aesthetic.
• Experiment with different layouts to find one that suits your personal style and space.
• Displaying cherished memories in old frames adds character to your home decor.
Repurposing Old Mirrors for a Statement Piece
Old mirrors have the potential to be transformed into striking statement pieces that can enhance any room in your home. With a bit of creativity and some simple DIY techniques, you can give new life to an old mirror, turning it into a focal point that adds character and style to your space. By repurposing an old mirror, you not only breathe fresh life into the piece but also create a unique and personalized decor item that reflects your individual taste.
One creative way to repurpose an old mirror is by giving it a fresh coat of paint in a bold or elegant color that complements your existing decor. Whether you opt for a sleek black finish for a modern look or a soft pastel hue for a shabby chic feel, painting the frame of an old mirror can instantly transform it into a statement piece that catches the eye. Additionally, you can further customize the mirror by adding decorative accents such as stenciling, decoupage, or embellishments to create a one-of-a-kind design that reflects your personal style.
• Transform old mirrors into striking statement pieces
• Enhance any room in your home with repurposed mirrors
• DIY techniques can breathe new life into old mirrors
• Create a unique and personalized decor item
One creative way to repurpose an old mirror is by giving it a fresh coat of paint in a bold or elegant color that complements your existing decor. Whether you opt for a sleek black finish for a modern look or a soft pastel hue for a shabby chic feel, painting the frame of an old mirror can instantly transform it into a statement piece that catches the eye. Additionally, you can further customize the mirror by adding decorative accents such as stenciling, decoupage, or embellishments to create a one-of-a-kind design that reflects your personal style.
Using Old Trunks and Chests as Coffee Tables
Repurposing old trunks and chests as coffee tables is a creative way to add character and charm to your living space. These vintage pieces not only serve as functional coffee tables but also offer extra storage for blankets, books, or other living room essentials. The sturdy construction of trunks and chests makes them perfect for holding beverages, snacks, and decorative items while also adding a sense of history and nostalgia to the room.
By utilizing old trunks and chests as coffee tables, you can bring a unique and eclectic look to your home decor. Whether you prefer a more rustic or an antique feel, these repurposed pieces can be customized with a fresh coat of paint, stenciling, or quirky hardware to suit your style. Additionally, the different sizes and shapes of trunks and chests provide versatility in design, allowing you to mix and match various pieces to create a one-of-a-kind coffee table arrangement that reflects your personal taste.
• Repurposing old trunks and chests as coffee tables adds character and charm to your living space.
• These vintage pieces offer extra storage for blankets, books, or other living room essentials.
• The sturdy construction of trunks and chests makes them perfect for holding beverages, snacks, and decorative items.
• Utilizing old trunks and chests as coffee tables brings a unique and eclectic look to your home decor.
• Customize these repurposed pieces with paint, stenciling, or quirky hardware to suit your style.
• Different sizes and shapes of trunks provide versatility in design for a one-of-a-kind coffee table arrangement.
Repurposing Old Headboards into Benches
Repurposing old headboards into benches offers a creative way to breathe new life into outdated or unused furniture pieces. By utilizing the sturdy structure of a headboard and incorporating a few additional elements, you can transform it into a functional and stylish bench for your home. This repurposing project not only reduces waste but also allows you to showcase your DIY skills and add a unique piece to your decor.
With a few simple tools and materials, such as a saw, sandpaper, paint or stain, and upholstery fabric, you can easily convert an old headboard into a charming bench. By cutting the headboard to the desired size and adding legs or a seating platform, you can create a personalized piece that suits your style and space. Whether you choose to upholster the bench for added comfort or leave it with a distressed finish for a rustic look, repurposing old headboards into benches is a budget-friendly and environmentally conscious way to update your furniture collection.
• Repurposing old headboards into benches is a sustainable way to reduce waste and give new life to outdated furniture pieces.
• By using simple tools like a saw, sandpaper, paint or stain, and upholstery fabric, you can easily transform a headboard into a stylish bench.
• Cutting the headboard to your desired size and adding legs or a seating platform allows you to customize the bench to fit your space and style.
• Whether you prefer an upholstered bench for added comfort or a distressed finish for a rustic look, repurposing old headboards offers endless possibilities for creativity.